
- Usage
- Track->Tracking Wizard...
- Settings->Background Model...
- Settings->Background Subtraction...
- Settings->Tracking Settings...
- Track->Start Tracking
- Track->Choose Orientations...
- Analysis Plots
- File->Export as MAT-file...
- File->Export as CSV-file...
- Display Control
- Other Commands
- Automation
- Example Video, Annotation, and MAT files
- Annotation File Format
- Ctrax version notes
Usage
The first order of business after starting Ctrax is to open a video to be processed by selecting File->Open. See Input Video Formats for information on the types of video Ctrax currently supports. The tracking results will be saved in the same location as the movie file, with the extension .ann. This annotation file will contain the flies' trajectories, as well as all parameters used during tracking. If the movie has previously been tracked, Ctrax will read in the parameters and trajectories, and tracking can be either resumed or restarted from the beginning. A backup copy of the previous tracking results is created in the same directory.

Screenshot of main Ctrax window (right) and zoom window (left).
Ctrax will then bring up the main Ctrax window, shown at right. The main panel shows a frame of the video. To track a video, perform the following steps:
- Alter the tracking settings to match your video, by one of the following two methods:
- Run the Tracking Wizard: Ctrax Track->Tracking Wizard... AND/OR
- Calculate the settings individually. More settings are available through this method than through the Tracking Wizard, and such detailed tracking configuration may or may not be necessary.
- Compute the background model: Ctrax Settings->Background Model...
- Set the background-subtraction parameters: Ctrax Settings->Background Subtraction...
- Set the tracking parameters: Ctrax Settings->Tracking Settings...
- Begin tracking: Ctrax Track->Start Tracking.
- When tracking is complete, resolve the 180-degree orientation ambiguity: Ctrax Track->Choose Orientations....
- Write the output trajectories to a .mat file for use with the FixErrors Matlab GUI, the BehavioralMicroarray Matlab Toolbox, or other Matlab code: Ctrax File->Export as MAT-file....
Ctrax Track->Tracking Wizard

Tracking Wizard assists in choosing thresholds.

Initial view of the Tracking Wizard.
The Tracking Wizard [new in version 0.3.0] helps set the most common necessary parameters for tracking. For simple and easy arena configurations, the Tracking Wizard may be sufficient to provide high-quality tracking. Many users will still need to perform detailed parameter-setting as described below, but the Tracking Wizard can provide guided initialization for that process.
The tracking wizard sets the following parameters, in order:
- Tracking type: Dark flies on a light background, or light flies on a dark background.
- Region of interest: Tracking power should not be wasted on regions of the image that are outside of the arena, which can also confuse the tracker.
- Fixing background: If some flies do not move during the movie, they may become part of the background. This can be fixed by interpolating the image across user-defined regions that include stationary flies.
- High threshold: "Foreground" (fly) pixels are discriminated from background by their distance from the background model. The high threshold is the minimum required "brightness" (distance from background) required in each foreground component. I.e., the high threshold is the detection threshold.
- Low threshold: The area surrounding each "bright" pixel is considered to be foreground as long as it is above the low threshold. Therefore, the low threshold determines the edges of each foreground component.
- Shape computation: Each connected set of foreground pixels is initially assumed to be a single fly. Connected components that differ greatly in size or aspect ratio from the average fly are merged, split, or discarded. The average and allowed variance in size are learned from a subset of images, or they can be set manually.

Drag to zoom in.
Dragging a bounding box on any of the images provides the ability to zoom in on it (double-click to zoom out).
Ctrax Settings->Background Model...

Screenshot of the Background Model Settings dialog.
The first step to start tracking is to set up the background model (see Background Subtraction Considerations). First define the parameters of the background model computation, then hit the "Calculate Now" button to compute. Note that this dialog has no effect if the movie loaded in is an SBFMF, as the background model is provided by that movie. The parameters to set are the following:
- Algorithm: This is the algorithm used to estimate the background image and background deviation. "Median/Median Absolute Difference" estimates the center image as the median of the sampled frames and the standard deviation from the median absolute difference from this median. "Mean/Standard Deviation" estimates the center image as the mean of the sampled frames and the deviation as the standard deviation of the sampled frames. In all our experiments, we use the "Median/Median Absolute Difference" algorithm.
- Number of frames: Background is estimated from frames sampled evenly between the first frame and the last frame of the input video. Specify the number of frames to sample here. In all our experiments, we used 200 frames.
- First Frame and Last Frame: Specify the interval from which to sample frames to estimate the background. In our experiments, we noticed that the flies toward the end of longer trials tended to sit still, which can interfere with background modeling. In our current experiments, we use the first 6000 frames = 5 minutes of video to estimate the background model.
Ctrax Settings->Background Subtraction...

Screenshot of the Background Subtraction Settings dialog
Background subtraction involves thresholding the difference between the current frame and the mean background image divided by the normalization image. If "Background Type" is "Light flies on dark background", then Ctrax only looks for pixels that are brighter than the background image, with the threshold:
[distance image] =
  ([current image] - [mean background image]) /
  [normalization image]
If "Background Type" is "Dark flies on light background", then Ctrax only looks for pixels that are darker than the background image, so the threshold is:
[distance image] =
 -([current image] - [mean background image]) /
  [normalization image]
If "Background Type" is "Other", then Ctrax looks for any difference from the background, and thresholds the absolute difference:
[distance image] =
  |[current image] - [mean background image]| /
  [normalization image]
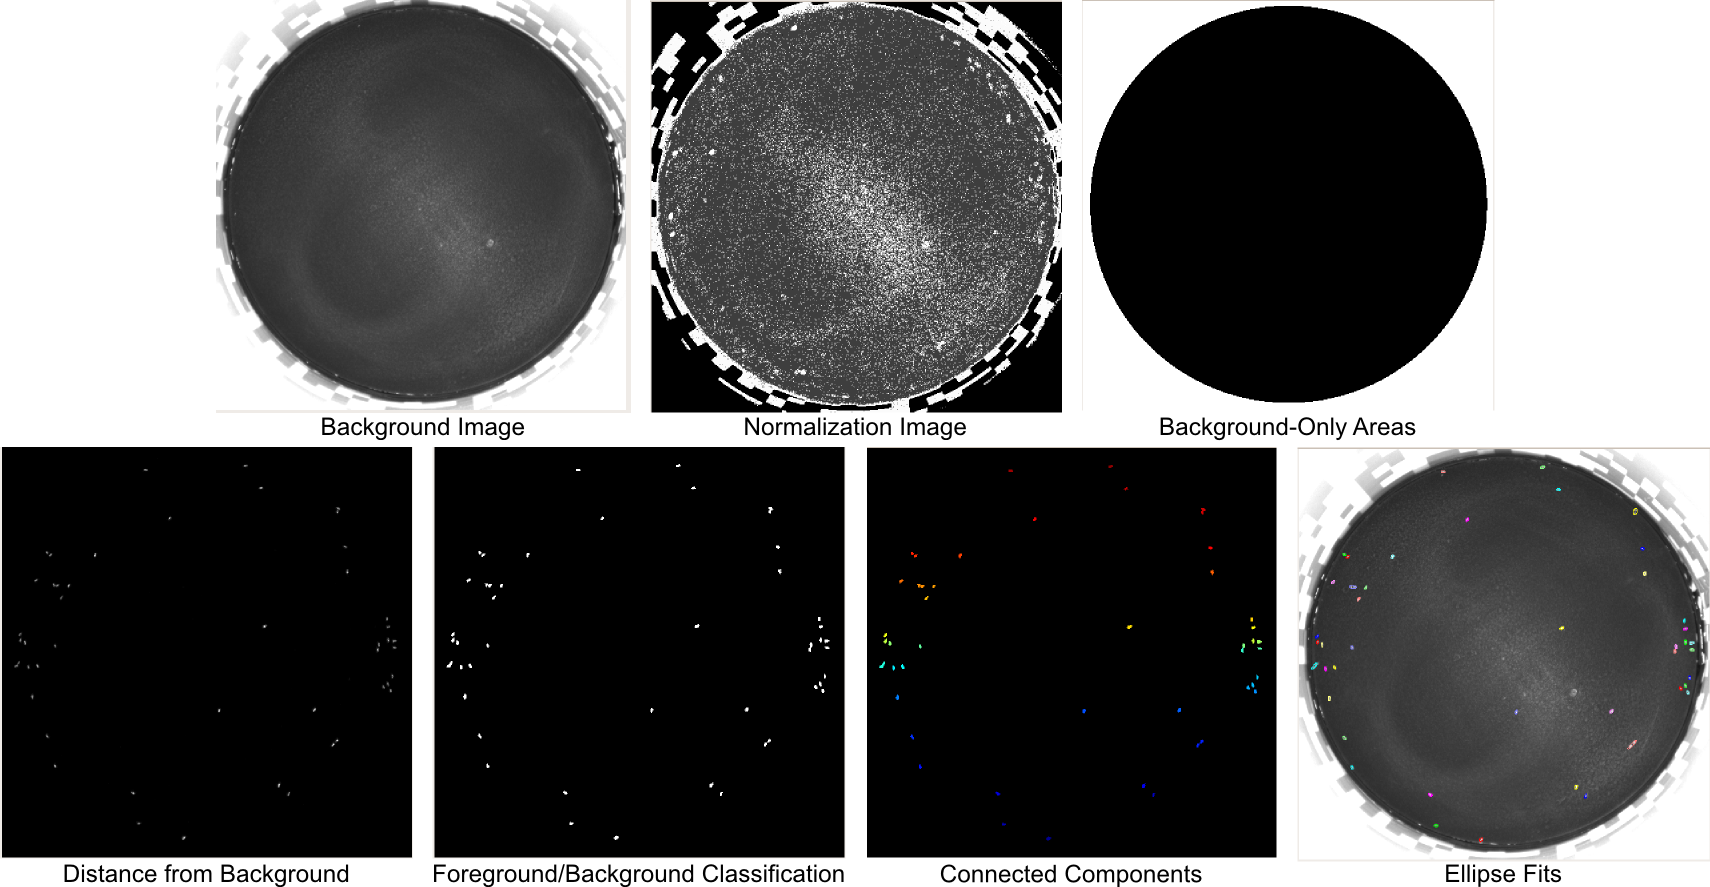
The image that is thresholded, the "distance image", can be thought of as the distance between the background model and the current image. This distance image can be seen if "Distance from Background" is selected from the display drop-down menu.
- The mean background image can be seen by selecting "Background Image" from the display drop-down menu. It is the mean image computed during the background modeling step (Ctrax Settings->Background Model...).
- The normalization image is defined in the "Normalize by" drop-down menu. It can be seen by selecting "Normalization Image" from the display drop-down menu.
- If "Standard Deviation" is selected, then Ctrax normalizes by the thresholded standard deviation, as computed in the background modeling step. The thresholds are set at "Std Range". The standard deviation image is more susceptible to errors in estimation from flies sitting still for long periods of time. If you see bright spots in the normalization image that are fly-shaped, these are probably caused by flies that sit still for too long. Having bright spots like this can cause the background subtraction to fail in these areas, as it is equivalent to setting the threshold to much higher values in these regions of the image. One can avoid this by setting the range of allowed standard deviations. In our experiments, we normalize by the standard deviation, and we set the Std Range so that the maximum standard deviation is three times the minimum standard deviation, and the range is centered on the average standard deviation for the arena (for our open arena, this is [1,3]).
- If "Background Brightness" is selected, then we normalize by the background mean image. This is sometimes a reasonable approximation, as in general the brighter the pixel, the higher the noise is.
- If "Homomorphic Filtering" is selected, then Ctrax approximates Homomorphic Filtering on the current image. This approximation consists of finding the normalization image that would give the same results as homomorphic filtering on the background mean image, then just normalizing any given frame by this normalization image. The parameters of the homomorphic filter can be set by clicking the "Homomorphic Filter Settings..." button.
- There may be regions of the video where there will never be
flies. The regions of the image that will always be classified as
background are shown in white if "Background-Only Areas" is selected
from the display drop-down menu. You can force the algorithm to never detect foreground in certain regions in the following three ways.
- Set the "Minimum Non-Foreground Intensity". All locations in the image such that the mean background image is above this value will always be classified as background. Similarly, you can set the "Maximum Non-Foreground Intensity" and all locations in the image such that the mean background image brightness is below this value will always be classified as background.
- Set a circular region of interest using the "Detect Circular Arena" dialog. All regions outside of the circle are assumed to be background. In this dialog, the image panel shows edges detected in the image. The circular region of interest can be manually adjusted by dragging the green and yellow circles to set the center and radius, respectively. Or, the "Radius", "X", and "Y" values can be adjusted manually. The circular region of interest can also be detected automatically by fitting a circle to edges in the image using the "Detect Arena" button. "Refine Estimate" can be used to automatically refine the estimate. The edge threshold used can be increased or decreased using the "Edge Threshold" control. We used the automatically detected circular region of interest in our experiments, as the wall of the arena was reflective, and flies were spuriously detected on the walls when this region of interest was not set.
- Set polygonal regions of interest using the "Regions of Interest" dialog [new in version 0.1.4]. Regions outside of all polygons set are assumed to be background. In this dialog, the image panel can show either the background model center or the currently selected regions of interest in white and the always-background regions in black. The previously selected polygons are shown by red lines. To select a region, click on the image. Continue clicking to add more points. Either double-click the start point or push the "Close" button to close and add the selected region. To cancel adding the current polygon, push the "Cancel" button. To remove the last-added polygon, use the "Undo" button. To save the currently selected regions, use the "Save" button. To close the dialog, use the "Quit" button.

Screenshot of Detect Circular Arena dialog

Screenshot of Regions of Interest dialog
To obtain a classification of each pixel location as foreground or background, Ctrax thresholds the distance image, the normalized difference between the current image and the background mean. It uses a hysteresis approach to thresholding. For a pixel to be foreground, its distance from the background must be above a low threshold ("Low Thresh"), and there must be a path from it to a pixel that is above a higher threshold ("High Thresh") that only goes through pixels above the low threshold. That is, Ctrax finds all pixels that are above the low threshold, then removes all connected components of pixels such that no pixel in the connected component is above the high threshold. The low and high thresholds can be set with the scrollbars on the left. The low threshold cannot be higher than the high threshold. Changing the normalization algorithm will greatly change the range of distances, so the GUI tries to compensate for these changes in magnitude. The classification of pixels into foreground and background can be seen by selecting "Foreground/Background Classification" from the display drop-down menu.
If there are flies that are not being detected, lowering the high threshold can help. If there are objects other than flies being detected, raising the high threshold can help. Lowering the low threshold will result in the area of the detected flies being bigger and raising the low threshold will result in the area of the detected flies being smaller. Setting the low threshold too low will result in noise near a fly being detected as part of the fly. The benefits of a larger area are that Ctrax can better estimate the center position and orientation of the fly. The disadvantages of a larger area are that when flies are close to each other, they will merge into a single connected component, and clustering will need to be used to separate the flies, causing the tracker to run slower. The connected components of foreground pixels can be seen by selecting "Connected Components" from the display drop-down menu. The ellipses fit to each connected component of foreground pixels can be seen by selecting "Ellipse Fits" from the display drop-down menu. Note that if two flies are part of the same connected component, they will only be fit at this step by one ellipse. When tracking is performed, this ellipse may be split into multiple flies, depending on the tracking settings. This is the best display setting for looking for errors in the background-subtraction step, as it displays the raw frame below the annotated ellipses. For all display settings, the frame shown can be controlled with the slider bar below the image panel.
Camera noise and compression artifacts can potentially be compensated for by applying morphological filtering. One can apply Morphological Opening and Morphological Closing. We do not use morphological filtering in our experiments.
If a fly sits still for too long, the background model may assume that this fly is part of the background. Errors in the background modeling can be fixed using the "Fix Background Model" dialog [new in version 0.1.4]. Using this dialog, one can select polygonal regions of the image, and fill these regions by interpolating from the boundaries. The interface is the same as the "Regions of Interest" dialog. The image panel can show either the background model center or deviation estimates.
Ctrax Settings->Tracking Settings...

Screenshot of the Tracking Settings dialog.
The "Settings->Tracking Settings..." dialog controls the parameters of the observation detection, identity assignment, and hindsight steps. Please see the related sections in the online methods and supplementary note of the article, "High-Throughput Ethomics in Large Groups of Drosophila."
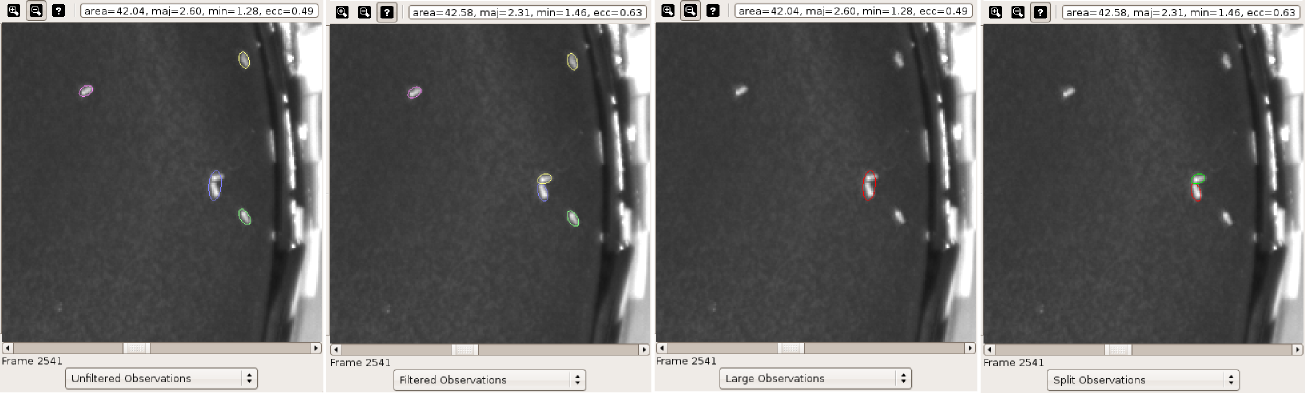
Screenshot of some of the shape parameter-related displays in the Tracking Settings dialog.
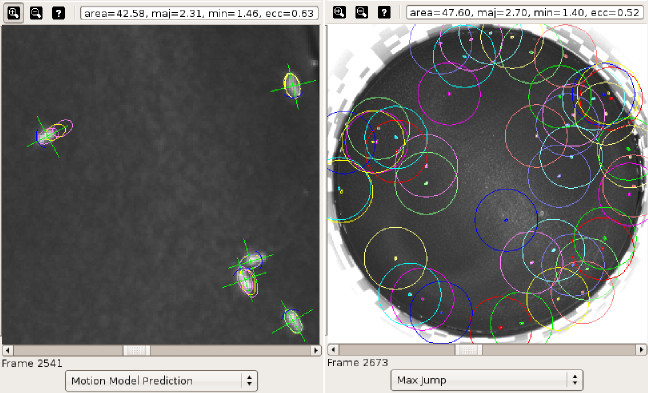
Screenshot of some of the motion parameter-related displays in the Tracking Settings dialog.
The right side of the dialog shows the current frame annotated with estimates of the positions of the flies at different stages in the algorithm so that the user may attempt to see the effects of many of the parameters. The toolbar above the image allows one to zoom in, zoom out, and get information about the shape of the next-selected fly. The following displays are available.
- Unfiltered Observations: The current frame is annotated with the ellipses fit to each connected component of foreground pixels (the same as "Ellipse Fits" in the Background Subtraction dialog).
- Filtered Observations: The current frame is annotated with the final results from the observation detection step -- the result of modifying the ellipse fits based on the model of allowed fly shapes.
- Small Observations: The current frame is annotated with ellipse fits for only those connected components whose area is smaller than the minimum area.
- Large Observations: The current frame is annotated with ellipse fits for the only those connected components whose area is bigger than the maximum area.
- Deleted Observations:The current frame is annotated with the initial ellipse fits for connected components that are ignored in the detection step.
- Split Observations: The current frame is annotated with observation detections that resulted from large observations being split into multiple flies.
- Merged Observations: The current frame is annotated with observation detections that resulted from small observations being merged into a single fly.
- Threshold-Lowered Observations: The current frame is annotated then observation detections whose initial area was small and were enlarged by lowering the background subtraction threshold nearby.
- Max Jump: Illustration of the "Max Jump Distance" parameter from the "Motion" tab. The current frame is annotated with a circle for each fly. The radius of this circle reflects the maximum distance between the predicted and detected positions of a fly if the change in orientation is zero. If the distance is larger than this, then the algorithm will instead create a new trajectory.
- Motion Model Prediction: Illustration of the motion model parameters. For each fly in the current frame, we show the previous two positions of the fly and the predicted position of the fly in this frame. The green bars and blue arcs illustrate the relative weight of errors in orientation matching and center position matching. The green lines are equivalent in error weight to the blue arcs.
Tracking Settings: Shape Parameters

Screenshot of the four Tracking Settings dialog tabs.
The parameters controlled by the Tracking Settings Shape tab describe the expected sizes of the ellipses fit to each fly. These parameters set the minimum allowed, expected, and maximum allowed area of a fit ellipse, major axis length of a fly, minor axis length of a fly, and eccentricity of a fly. Currently, the eccentricity is not used by the tracking algorithm.
If the area of a connected component is larger than the maximum area, the algorithm clusters the pixel locations in the component into iteratively increasing numbers of ellipse fits (the shape-parameter related displays above show a large connected component that is split into two ellipses). The number of ellipses to split into is chosen so that each ellipse respects the area and major and minor axis length upper bounds, and the area of each ellipse is close to the mean area.
If the area of a connected component is smaller than the minimum area allowed, then Ctrax first tries to enlarge it by decreasing the background-subtraction threshold near the connected component. If this does not result in a sufficiently large connected component, then Ctrax tries to merge it with nearby connected components without changing the foreground/background classification of "too many" pixels. The minimum area should thus be set to first make the expected area of a fly close to the mean of the minimum and maximum bounds on the area and second so that it is approximately the minimum area of a fly. (In a future version of Ctrax, we plan to separate the mean area and minimum and maximum area controls.)
You can use the "Automatically Compute Bounds on Shape" option to estimate these bounds. This will cause the algorithm to sample "Number of Frames" frames from the video, then find the median and median-based approximation of the standard deviation of the area, major and minor axis lengths, and eccentricity of the connected components of foreground pixels in these frames. You can then approximate the bounds as the median plus or minus some number of standard deviations. The results of the automatic computation are shown in the "Manually Set Bounds on Shape" section, and can be adjusted manually after being approximated automatically.
When we are choosing the parameters for a new experimental set-up, we first automatically compute the bounds from 50 frames and set the "Number of standard deviations" to 3. Then, we use the "?" toolbar button to inspect the actual sizes of the ellipses in some frames with the "Unfiltered Observations" display selected, and set the maximum bounds to be the maximum value we observe in our sample. Finally, we set the minimum bound on area so that the mean of the minimum and maximum bounds on area is near the automatically set mean of the minimum and maximum bounds. We then scroll through a bunch of frames with the "Small Observations" and "Large Observations" displays selected, to make sure that there are not many small observations and that the large observations in general correspond to multiple flies. You can also use the "Filtered", "Merged", "Split", and "Threshold-Lowered" displays to observe the effects of these parameters.
Tracking Settings: Motion Parameters
Ctrax assigns identities to each detected observation by matching the detected ellipses to the predicted ellipse positions based on the the previous two frames and the motion model. Its goal is to minimize the distance between the detected and predicted ellipses. This distance is based on both the center position of the ellipse and its orientation. The "Angle Weight" parameter specifies the relative importance of the orientation with respect to the center position. The total error is the squared distance between the predicted and detected center positions plus the angle weight times the squared distance between the predicted and detected orientations (which are all between 0 and 180 degrees). The error in the center position is measured in squared pixels and the error in the orientation is measured in squared radians. Thus, the angle weight should be higher than 1, even if the desired effect is that the orientation be less important than the center position in the matching. In all our experiments, we used weight 100. The relative importance of the center position versus the orientation can be visualized using the "Motion Model Prediction" display. An error in the center position prediction equal to the length of a green bar is equivalent to an error in the orientation of size equal to the blue arc.
The "Max Jump Distance" is the square root of the maximum error allowed between predicted and observed positions. If the orientation error is 0, then this is the maximum distance that a fly is allowed to jump from its predicted position. The "Max Jump" display allows one to visualize this distance, as the circles drawn around each fly are of radius "Max Jump Distance". "Max Jump Split" [new in Ctrax 0.3.1] allows you to prevent large blobs from splitting and jumping in the same frame, whereby they might capture a nearby fly's track. I.e., if an observation is the result of splitting a large connected component, then the maximum distance the fly can jump to this observation is "Max Jump Split", which can be set to something smaller than "Max Jump".
The "Center Dampening" and "Angle Dampening" control the predicted position of the fly given its previous two positions. The algorithm predicts that the center position will be the previous center position + velocity * (1 - "Center Dampening"), and that the orientation will be the previous orientation + angular velocity * (1 - "Angle Dampening"). In our experiments, we set the center dampening coefficient to 0 (pure constant velocity model), and the angle dampening coefficient to 0.5. The effects of these parameters can be seen in the "Motion Model Prediction" display, which shows the predicted positions of the flies based on this dampened constant velocity model.
Tracking Settings: Observation Parameters
The observation parameters affect the processing of connected components of foreground pixels into ellipse fits.
- Max Area Delete: If a connected component cannot be merged with other connected components or sufficiently enlarged by lowering the background-subtraction threshold and has area at most "Max Area Delete", then this connected component is ignored and not included as an observation detection. Area is measured in pixels squared.
- Min Area Ignore: Extremely large connected components may be caused by objects other than flies or lighting changes. "Min Area Ignore" is the minimum area of large foreground detections to be ignored.
- Max Penalty Merge: Ctrax checks to see if small connected components can be merged with nearby connected components by flipping the labels of some pixels from background to foreground. "Max Penalty Merge" is the maximum total distance from the background model minus the foreground threshold of the background pixels that must be flipped to connect the two connected components.
- Lower Threshold: If the area of a connected component is small, Ctrax tries to lower the foreground/background threshold around this connected component to increase its area. During this process, "Lower Threshold" is a multiplier for the current low-end threshold.
- Max Clusters per Blob: Ctrax will never split a connected component into more than this many flies.
- Max Blobs to Detect: If a small, known number of flies are present in the arena, this setting can be used to prevent tracking of other foreground areas. Putative foreground detections are sorted in descending order of size and only "Max Blobs to Detect" are processed further. The smaller detections are discarded.
Tracking Settings: Hindsight Parameters
Because the algorithm performs detection independently of matching, errors in the observation-detection step are common. We use the hindsight step to modify trajectories after matching to avoid the deaths and births of trajectories. There are four types of modifications which can be made. The checkboxes in the "Hindsight" tabs indicate whether each of the four types will be attempted. For each of the four types, "Max Sequence Length" indicates the number of frames Ctrax will look backward to fix these potential errors. In all our experiments, we set this to 50 for all types of errors.
- Fix Split Detections: Ctrax looks for births of trajectories caused by a single fly being split into two detections. These two detections will be merged for up to "Max Sequence Length" frames to avoid the trajectory birth if the merge penalty (number of pixels that must be flipped from background to foreground to merge) is less than "Max Penalty Merge". We set this to 40, the same value we used for "Max Penalty Merge" in the "Observation" tab.
- Fix Merged Detections: We look for deaths of trajectories caused by two flies being merged into a single detection. These detections will be split for up to "Max Sequence Length" frames to avoid the trajectory death if the change in the total prediction error in the first frame merged is at most "Max Prediction Error Increase". Recall that the units of this can be thought of as pixels squared. We used 20 in all our experiments.
- Fix Spurious Detections: Ctrax will delete any newly born trajectories that die within "Max Sequence Length" frames.
- Fix Lost Detections: Given a trajectory birth, Ctrax looks backward up to "Max Sequence Length" frames to see if there is a trajectory death that would end up near this trajectory birth, then connects the trajectories to avoid the track birth.
Track->Start Tracking
The "Track" menu has various ways to start/restart tracking.
- Start Tracking will delete any trajectories computed previously and start tracking from the current frame. Be careful with this option.
- Resume Tracking will go to the last frame for which trajectories have been computed and restart tracking from there.
- Resume Tracking from Current Frame will keep trajectories computed for frames before the current frame, remove trajectories from this frame on, and restart tracking from the current frame.
Track->Choose Orientations...

Screenshot of "Choose Orientations..." dialog.
The tracking algorithm only computes orientation modulo pi radians -- it does not resolve the head-tail ambiguity. "Choose Orientations..." resolves this ambiguity using the velocity of the flies. It is based on the following two assumptions:
- When the fly is walking, it is usually walking forward.
- The orientation does not change much from one frame to the next.
"Choose Orientations..." decides whether to add pi radians to a fly's orientation in each frame to minimize the following criterion:
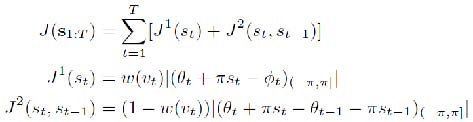
Here, J1 is the velocity direction constraint, where θt is the orientation at frame t (modulo π radians), φt is the velocity direction at frame t (modulo 2π radians), and st is whether or not to add π to the orientation. J2 is the temporal constraint. vt is the speed in frame t. The weight w(vt) is the weight of the velocity term with respect to the temporal term:
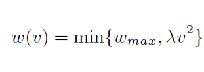
λ is the "Velocity Weight Constant" and wmax is the "Maximum Velocity Weight". In all our experiments, we set "Velocity Weight Constant" to .05 and "Maximum Velocity Weight" to 0.25.
Analysis Plots
Ctrax includes plotting functionality for several common types of data visualization. These are intended primarily to check the sanity of the tracked parameters; publication-quality figures can be produced more easily in MATLAB (see below). However, Ctrax's figures can be saved as images by right-clicking on the figure and using the "Save as..." option.
To save on memory and processing power, the analysis plots only use the tracked data from the first 500 frames of the video. The axis limits are determined from the data and cannot currently be altered.
Analyze->Plot Trajectories
Shows the raw (x,y) positions of all flies through time, each in its own color. Jagged tracks or data outside the arena area are indicative of tracking errors.
Analyze->Plot Velocities
Shows the time course of the flies' speeds (the 2D Euclidean distance moved per frame). The plot is a standard-deviation envelope of the population's mean speed in each frame (the mean +/- the S.D.).
Analyze->Position Histogram
Shows a "heatmap" 2D histogram of fly (x,y) positions. Asymmetries in where flies spend their time in the arena could possibly indicate non-uniform lighting or temperature in the arena. Fly positions outside the arena again suggest errors which may be eliminated by using a tracking region of interest.
Analyze->Speed Histogram
Shows a histogram of the flies' displacement velocities. A non-smooth histogram might indicate tracking discontinuities.
Analyze->Turning Speed Histogram
Shows a histogram of the flies' turning rates. This should be roughly symmetrical and centered around zero. Frequent large turning rates suggest difficulties with determining fly orientations, possibly including the need to disambiguate the headings.
File->Export as MAT-file...
To analyze the trajectories in Matlab using either the FixErrors GUI or the BehavioralMicroarray Toolbox, one must save the trajectories to a Matlab-native format. This can be done by selecting "File->Export as MAT-file". This will prompt the user for the name of a .mat file. It will save the following variables:
- ntargets: 1 x nframes vector, where ntargets(t) is the number of flies tracked in frame t.
- identity: 1 x sum(ntargets) vector, where identity(1:ntargets(1)) are the identities of the flies tracked in frame 1, identity(ntargets(1)+1:ntargets(1)+ntargets(2)) are the identies of the flies tracked in the second frame, etc.
- x_pos: 1 x sum(ntargets) vector, indexed the same way as the identity variable, storing the x-coordinate of the center of a fly in pixels.
- y_pos: 1 x sum(ntargets) vector storing the y-coordinate of the center of a fly in pixels.
- maj_ax: 1 x sum(ntargets) vector storing the quarter-major axis length of a fly in pixels.
- min_ax: 1 x sum(ntargets) vector storing the quarter-minor axis length of a fly in pixels.
- angle: 1 x sum(ntargets) vector storing the orientation of a fly in radians.
As is, this is not most user-friendly format within Matlab. The load_tracks.m function within the BehavioralMicroarray Toolbox reads in this MAT-file and writes it out in a more usable format.
File->Export as CSV-file...
Ctrax can export the tracking data in a comma-separated-value (CSV) format for processing in many statistical software environments, including Matlab, R, JMP, or a spreadsheet program such as Microsoft Excel.
The CSV values will be in a nframes x 6*nflies rectangular matrix. Each row is a single frame of the movie, and each group of 6 consecutive columns contains data on a single fly. The six values are:
- the fly's identity
- x position, in pixels
- y position
- the length of its fit ellipse (i.e., the fly's body length), in pixels
- the width of the ellipse
- the angle of the ellipse (i.e., the fly's heading), in radians
Values of -1 indicate that no fly with that identity was tracked in that frame. It is common for flies to "disappear" and for "new" flies to appear over the course of a movie, as tracking errors sometimes result in an identity crisis. For cleaner data, export to Matlab first, run and complete FixErrors, then export as CSV at the prompt (or use the save_trxcsv function in Matlab). The Matlab CSV export will give positions and sizes in millimeters rather than pixels, if a conversion is available.
Display Control
The frame shown in the main panel can be controlled with the slider bar below it. The frame number is also shown in the toolbar at the bottom, and the frame shown can also be modified by editing this displayed frame number. The buttons on the toolbar, from left to right, have the following effects:
- Magnifying glass: If this is selected, when you click on a fly in the main panel, the zoom window (above, left) will pop up and show the selected fly in higher resolution. As the frame displayed changes, these zoomed views will update. Additionally, you can drag on an area of the movie frame to zoom in on it (double-click to zoom out).
- Play button: This will play the video at the speed set in "Play Speed".
- Stop button: This will stop playback of the video if the video is currently playing, or stop tracking if the video is currently being tracked.
- Fast-forward button: If the video is playing, then this will increase the playback speed. If the video is being tracked, this will increase the rate with which the display is refreshed.
- Rewind button: If the video is playing, then this will decrease the playback speed. If the video is being tracked, this will decrease the rate at with the display is refreshed. For fastest tracking, one can turn off automatic refreshing altogether in the Settings->Playback Options menu.
- Refresh button: During tracking, clicking this button will result in the display refreshing after the next frame that's tracked.
The "Settings->Playback Options" menu allows you to set the following playback parameters:
- "Show Old Annotation": Whether Ctrax annotates the displayed movie with the computed trajectories or not.
- "Tail Length": Number of frames for which to plot the center position of the fly previous to the current frame.
- "Line Thickness": How thick the lines and tracks drawn on top of the video image are.
- "Automatically Refresh": During tracking, whether Ctrax will refresh the screen with the current tracking results.
- "Dim Original": Whether to show the raw video darker -- this causes the trajectories to stand out more in the display.
- "Flip Movie Vertically" [new in version 0.4.2]: Some movie containers encode their video upside-down; Ctrax can flip the movie to compensate.
- "Transpose Indexed AVI" [new in version 0.3.11]: Some AVI recorders use indexed colors even when uncompressed (notably, StreamPix). Because of a Ctrax modification, the frames of indexed AVIs may be transposed (in the matrix sense). This setting toggles that behavior.
Other Commands
- File Menu
- ->Open: Open a different movie file.
- ->Load Settings from File...: Load the Ctrax settings from a different annotation file.
- ->Export as AVI: Writes the movie annotated with the computed trajectories to an uncompressed AVI. This can later be compressed using a free program like VirtualDub, FFmpeg, or Avidemux.
- ->Quit: Quit Ctrax.
- Track
- ->Write Compressed SBFMF while Tracking: Writes a Static Background Fly Movie Format version of the movie while tracking. This compresses the movie using the same background model and background-subtraction parameters used by the tracker.
- ->Compute Background: Computes the background model with the current background model parameters (see Ctrax Settings->Background Model...).
- ->Compute Target Shape: Automatically estimates the shape parameters using the current shape parameters (see Tracking Settings: Shape Parameters).
- Settings
- ->"Show Zoom Window": whether to show the zoom window display.
- ->"Ask for annotation file names": whether to prompt for the name of each .ann file. <moviename>.ann is the default.
- Help
- ->"Notify about updates": Every time it starts up, Ctrax will connect to the download site to look for a newer version. If this option is checked, a notification box will pop up once for each new version.
Automation
Batch Processing

Screenshot of "Batch Processing" dialog.
Ctrax can be set up to process multiple movies in a row, e.g., overnight. Select File->Batch Processing.
- Choose the movies to be processed using the "Add" and "Remove" buttons.
- "Load settings file": Set whether you want to load tracking settings from a file before each movie is tracked.
- "Save compressed SBFMF files": Set whether you want Ctrax to auto-generate static-background FMF files from the raw videos while tracking (identical to the option in Other Commands above).
- "Flip movies vertically" [new in version 0.4.2]: Set whether all the movies in the batch should be tracked upside-down by default (identical to the option in Display Control above).
- "Circular Arena": Set how the circular arena or region of interest should be calculated for each movie.
- "Shape": Set how the shape parameters (Tracking Settings: Shape Parameters) should be set for each movie.
- "Background Model": Set how the background model (image) should be set for each movie.
- Hit "Execute" to begin tracking.
The precedence for the tracking settings is somewhat confusing. Ctrax will attempt to calculate/load each setting from the following sources in order until a relevant source is found:
- Auto-detect/do not use
- Loaded settings file
- Existing settings (previous tracking data for that movie)
- User settings (the current settings as displayed in the Settings menus)
- Default settings
Running from the Command Line
Nearly all of the Ctrax functionality can be accessed from the command line, enabling advanced processing of movie batches. Run Ctrax --help to get a printout of the available options, or see the list below. In Windows, the command would be C:\"Program Files (x86)"\Ctrax0.5\Ctrax.exe --help , or in Mac OS X, /Applications/Ctrax.app/Contents/MacOS/Ctrax --help .